Step By Step: Hawaiian Tropical Breeze Nail Art by Gelish
Creative Academy is exhibiting on stand D14 at PB Ireland on 5-6 October and is generously giving away some tips on how to achieve perfect hawaiian tropical nails.
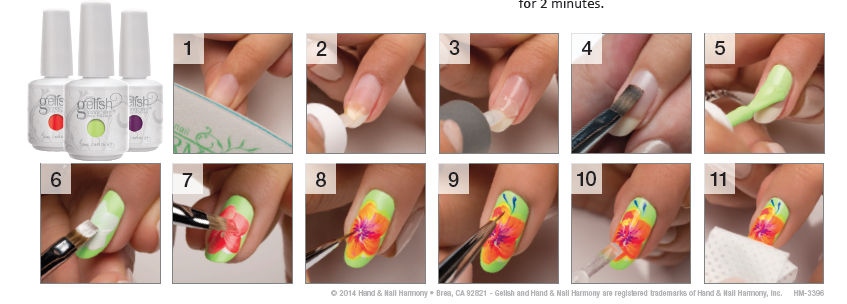
Step 1: After removing the shine from the natural nail plate, apply Gelish® Nail Surface Cleanse to a lint free nail wipe to remove any dust.
Step 2: Apply Gelish® pH Bond to the natural nail plate.
Step 3: Apply a thin coat of Gelish® Foundation from the cuticle to the free edge (Remember to seal the edge of the nail). Cure nails under the LED 18G light for 5 seconds or a UV light for 1 minute.
Step 4: Using a clean gel brush or a lint-free nail wipe, remove the excess Foundation from the nail plate.
Step 5: Apply a thin coat of Gelish® Soak Off Gel Polish “Lime All Time” from the cuticle to the free edge (Remember to seal the edge of the nail). Cure the nails under the LED 18G light for 30 seconds or a UV light for 2 minutes. Apply 2nd coat. Cure under the LED 18G light for 30 seconds or a UV light for 2 minutes.
Step 6: Using the #6 Square Gel brush with Gelish® Soak Off Gel Polish color “Arctic Freeze”, slightly blend the colors on the palette before applying onto the nail to draw the shape of a Hawaii Hibiscus flower. Repeat the same method for all the petals as desired. Cure under the LED 18G light for 30 seconds or 2 minutes under a UV light.
Step 7: Using the #6 Square gel brush with Gelish® Soak Off Gel Polish color “Rockin’ the Reef”, slightly blend the colors on the palette then apply on top of the white petals. Repeat the same method for all the petals as desired. Cure under the LED 18G light for 30 seconds or 2 minutes under a UV light.
Step 8: Using the custom Mini Striper Brush with Gelish® Soak Off Gel Polish color “Copa Cabana Banana”, define the outline of the petals starting from outside in, then inside out. Then using the Mini Striper brush with the color “Tahiti Hottie”, draw thin lines at the center of the flower for more detail. Using the Mini-Striper one more time with the blue color “Mali-Blu Me Away”, draw the 2 decorative thin lines next to the petal. Cure under the LED 18G light for 30 seconds or 2 minutes under a UV light.
Step 9: On the palette, mix a small amount of “Arctic Freeze” and “Copa Cabana Banana” to create a new opaque yellow. Using the Dotting tool with this custom blend color to make some yellow dots near the tip of the petal. Cure under the LED 18G light for 30 seconds or 2 minutes under a UV light.
Step 10: Apply a thin coat of Gelish® Top It Off Gel Sealer from the cuticle to the free edge to seal in the design on the nail (remember to seal the edge of the nail). Cure nails under the LED 18G light for 30 seconds or a UV light for 2 minutes.
Step 11: Remove the tacky residue on nails with the Gelish® Nail Surface Cleanse and a lint free nail wipe. Then, apply Gelish® Nourish Cuticle Oil to moisturize into the cuticle and the skin surrounding the nail.

If you haven’t done so yet, register for your FREE ticket here!

