Professional Beauty's live chat with OPI educator Bryony McMillan
It's time to get your nails into the Christmas spirit! We spoke with OPI educator Bryony McMillan, who showed us how to create five easy and funny Christmassy nail designs!
PB: Hi Bryony
OPI: Hi Professional Beauty!
PB: Thank you for sharing these fantastic designs with PB. I shall start by posting this lovely Penguin, would you guide us through the steps to create it?
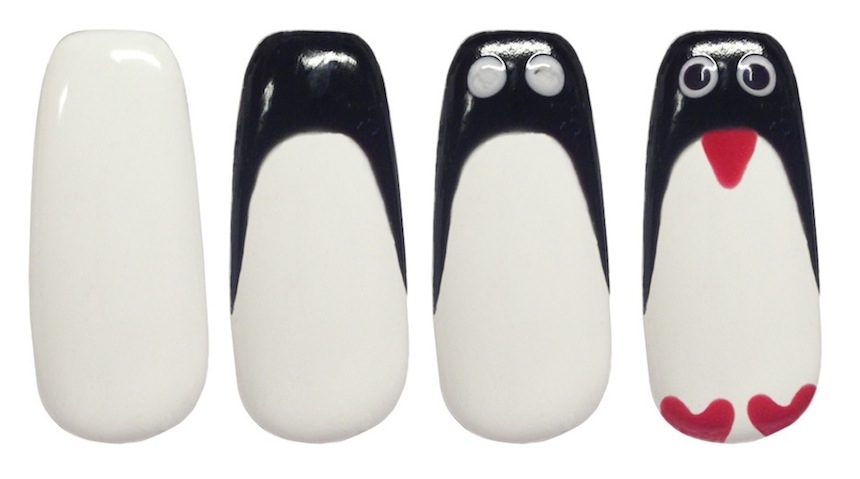
OPI: Of course! This Penguin is so easy to create as you can see, there are a few steps. Using OPI GelColor, start by applying two coats of 'Alpine Snow', curing in between layers. Then use a brush to apply 'Lady in Black' to the top part of the nail creating a curved tip, pull the black gel down the sides of the nail using a fine dotting tool to create the flippers. Cure and then apply two dots of 'Alpine Snow' over the black to create the eyes, these can be as big and cartoon like as you want. Cure under the LED light. You can then apply two smaller dots of 'Lady in Black' inside the eyes to make the Penguin come to life! For the beak and feet I used 'Cajun Shrimp'. Apply a small dot where you want the beak. Drag it down to a point to create a more triangular shape. For the feet apply two dots and allow them to touch, to the bottom left and two dots to the bottom right, cure these then you are ready to finish with top coat!
PB: Wow, it sounds quite easy, let's see a different version of Penguin, with earmuffs! How did you create it?
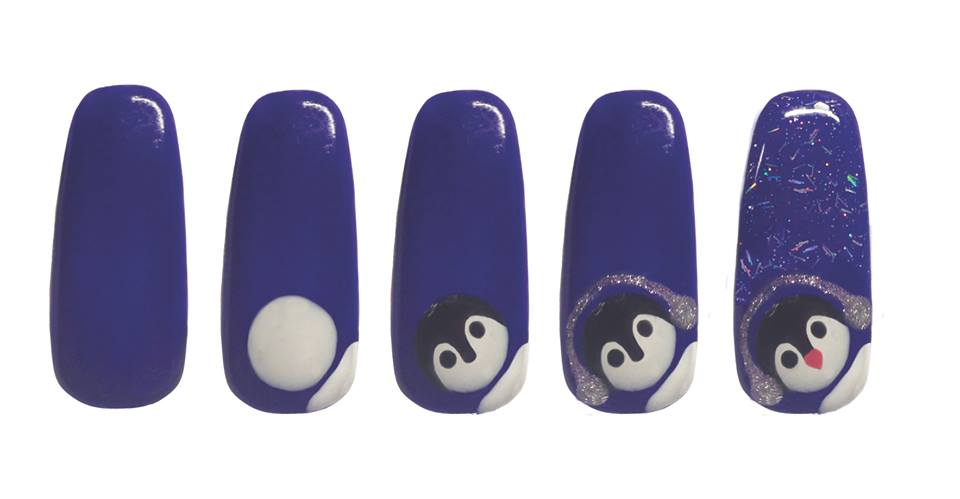
OPI: This one was my favourites to do! Start with two coats of 'Do You Have This Color In Stock-holm?' Once cured, using a large dotting tool, add a 5p size of 'Alpine Snow' and use circular motions to make the shape even and round. Then apply a small amount underneath this for the neck/body of the Penguin. Cure this using a fine point brush add the black markings to the Penguins head - 'Lady in Black', add two dots for the eyes and cure. For the ear muffs add two dots of 'Unfrost My Heart' either side of the Penguins head, use circular motions to make them rounded. From one side to the other drag the gel up and over the head using a fine point brush to complete the look of the ear muffs, cure. Use a small dot of 'Cajun Shrimp' for the beak, using a fine point brush drag down to a point. For the frosty/snowy background apply one coat of 'Desperately Seeking Sequins' (avoiding the Penguin) and cure... finish with a layer of top coat!
PB: Lovely! Shall we now go through this fantastic Reindeer nail art?
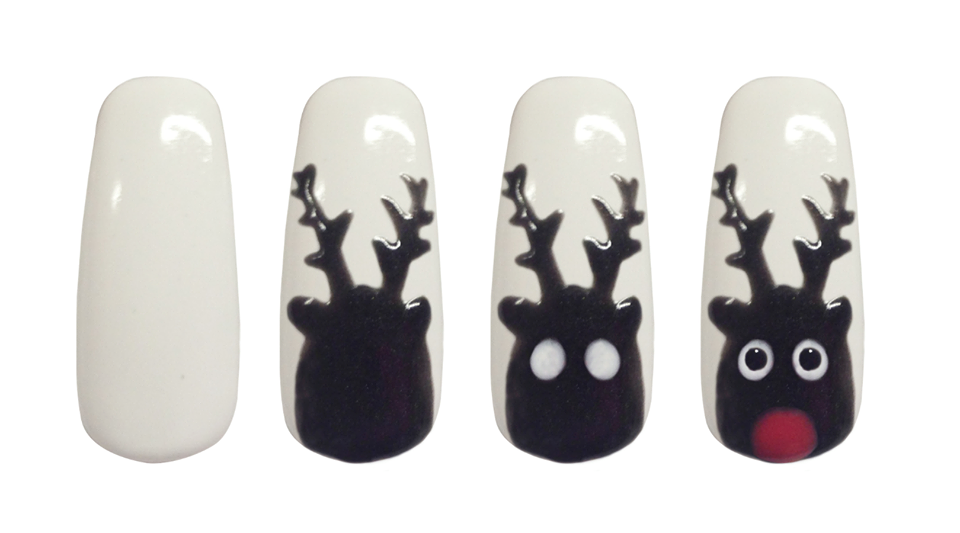
OPI: Sure! Start with two coats of 'Alpine Snow', over this apply a large dot of 'Love is Hot and Coal' and use the circular motions with the dotting tool to enlarge the circle and even it out. Before curing drag two lines up the nail and on these drag out smaller lines for the antlers, cure this and then add two dots of 'Alpine Snow' for the eyes. Bring the Reindeer to life by adding small dots of 'Lady in Black' inside the eyes, add a large dot of 'Cajun Shrimp' for the nose. Cure and finish with a top coat!
PB: Great! I have a question, obviously you have to be very precise to create these looks, which tools did you use?
OPI: I love using a range of dotting tools. There are lots of different sizes to make it easier. Also I clean up edges using an OPI Golden Point brush.
PB: The next look is this lovely Elf!
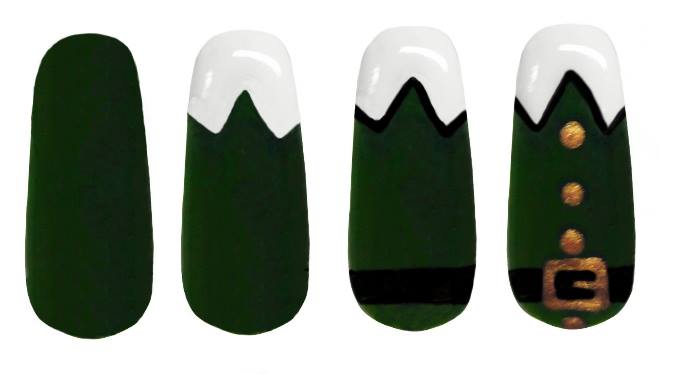
OPI: Apply two coats of 'Christmas Gone Plaid' or a red such as 'Big Apple Red' if you want to create a Santa instead of an Elf apply 'Alpine Snow' to the top of the design, to create the collar, drag the gel down using a fine dotting tool to, creating the points of the collar...cure this. Then add an outline to the collar using a fine point brush and 'Lady in Black', add a thick line 3/4 way down the nail for the belt, cure. Add dots of 'OPI With a Nice Finn-ish' down the centre for the buttons. Create a square outline on the middle of the belt for the buckle, cure this and finish with top coat!
PB: Fantastic! What a better way to conclude this tutorial than with this yummy Christmas Pudding!
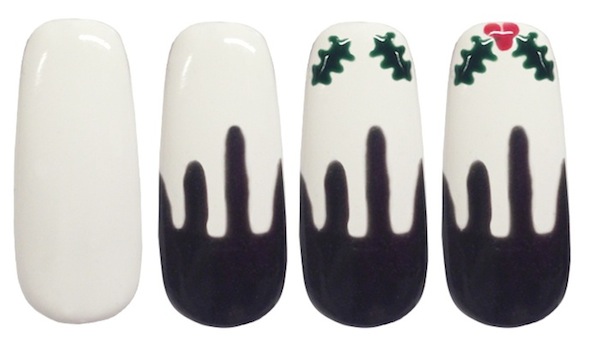
OPI: Start with two coats of 'Alpine Snow', over this add 'Love is Hot and Coal' to the bottom of the design and drag upwards using a dotting tool. The lines should all be uneven to help create the illusion of the white icing/frosting dripping down the cake, cure. Add two small lines of 'Christmas Gone Plaid', and on each, drag points out to create the sharpness of the holly leaves, cure this. Add three dots of 'Cajun Shrimp' for the berries... cure and finish with a top coat! Simple.
PB: Thanks Bryony, they all look amazing! How much time is required to create one of these looks?
OPI: It doesn't take long at all, about five minutes!
PB: And are the colours from your latest collection?
OPI: Some are classics, some are Nordic and Gwen Stefani Holiday
PB: Lovely! Thanks Bryony for your time and for giving us some nail inspiration for this Christmas!
OPI: No problem at all! Thank you for inviting me. Follow me on Instagram and Twitter @bryony_mcmillan for more!
PB: Don't miss out on OPI's latest products & innovations at Professional Beauty London, on stand I12, on 22-23 February at ExCeL! www.professionalbeauty.co.uk/london